REPAIR & RESTORATION

| REPRODUCTION PARTS |
| NEW HOUSES FROM SCRATCH |
| CATEGORIES |
| MAIN PAGE |
| TABLE of CONTENTS |

| MORE REFINISHING TIPS |
But, before you do anything else -
CLEAN 'EM FIRST!
THIS FEATURE is definitely open to VISITOR CONTRIBUTIONS! In fact, this first discovery is by Tom Hull of Alton, Kansas who has come up with the best way yet of cleaning dirty stucco-finish houses. I'll let him tell it in his own words:
| CLEANING METHODS |
<<
Elmer's and Brown Paper
ABOUT GLUES:
| GLUES AND ADHESIVES |
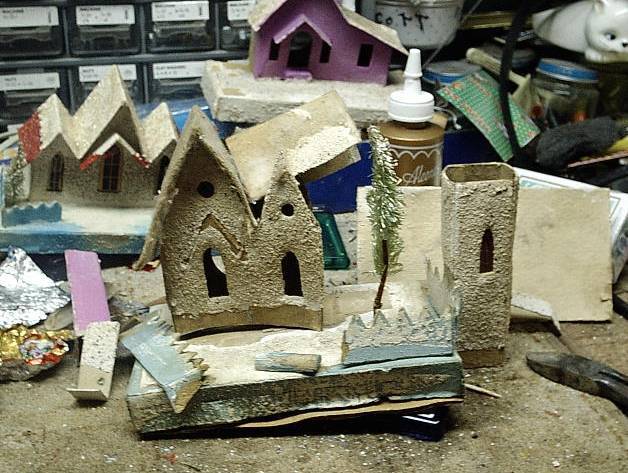
I don't believe I've ever tackled quite a basket-case like Tom's "Lazarus House" above, (truly brought back from the dead!) - but I have worked on some pretty bad ones. One very common problem is busted corners, bottom plates coming off the bases, etc. For these I settle down with my bottle of white glue, scissors, some popsicle sticks, an "Approx-O"(I refuse to call them "Exact-O")knife, straight pins and a crisp, unrumpled BROWN PAPER BAG from the grocery store. The bag paper is used to reinforce and hold together broken corner edges from the INSIDE.
I like the store bags because it's good, tough paper and because they come with crisp, precise factory-made creases that fit precisely into inside corners. I'll begin by cutting out these creases, leaving 3/8" to 1/2" of paper either side. I now have a supply of creased two-sided strips that will fit naturally, bridging both sides of the break.. I then cut a length to fit the current situation, trim where necessary, smear the glue evenly, completely covering one side of the brown paper, and poke it snugly into place and smooth it down with the popsicle sticks. The straight pins are sometimes neccesary to hold the broken edges together while the glues dries. When it does dry, the corners repaired are stronger than when new. I've used this basic technique to repair and reinforce antique train and Christmas light set boxes, too.
- Ted
ABOUT TREES:
| RESTORING TREES |
Replacing DOORS and WINDOWS:
"Ted, the following is a series of photos demonstrating installing windows. PS- Thanks for the windows."
SOME TIPS ON INSTALLING PAPA TEDS WINDOWS AND DOORS
- Tom Hull
| FURTHER TIPS on WINDOWS |
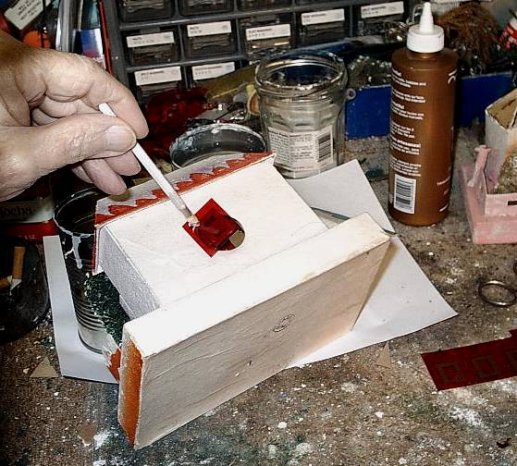
Applying glue through the front of door hole. This is often the easiest way and sometimes the only way when dealing with a blind back with a window in front.
This shows using a bent Q-tip to glue the surrounding frame. Notice the Giant door withthe fan light cut off. This will be saved as it may come in handy at some point. I save all of the scraps off of the cel windows for use in unprinted windows."
-Tom
Tom doesn't say what kind of glue he uses to hold the "CEL" types, but I use contact cement as described above. Apply it around the inside of the frame - NOT TO THE WINDOW! I never used Tom's bent Q-Tip method - always the flat toothpicks for me. I think the Q-tips would be fine for Elmer's and the paper doors/windows, but that contact cement is really stringy and gummy - I dunno ...
I haven't tried this, yet, but I think "KRAZY-GLUE GEL" might work well, too. You wouldn't have to make a complete round of the frame - just 6 or 8 anchoring spots.
-Ted

"This shows the use of a surgical clamp to move a cell win/door into place from a blind back. It was necessary to use the bent Q-tip to get glue around the frame. I use the Q-tip (with the cotton pulled off) as there is more stability and it smears the glue around better than a small strip of cardboard.
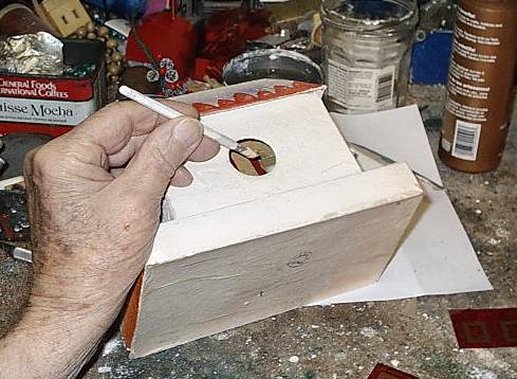
GLUING WINDOW THROUGH BACK LIGHT HOLE.
In this instance this larger house made it too difficult to get a Q-tip glue application with any degree of control so I opted for the much longer tool shown here. This is a wide plastic model brush with the bristles removed.

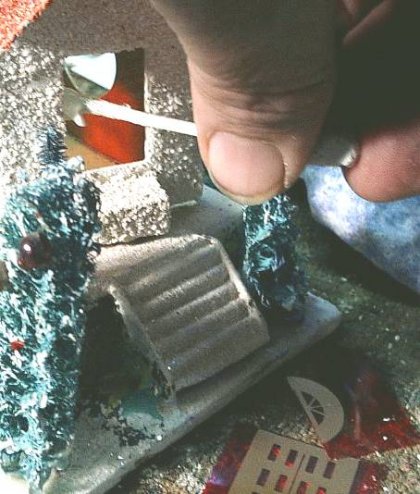
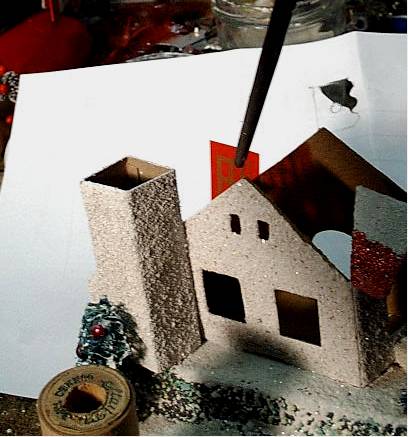
This illustrates how to insert a long win/door into a light hole. You take a Papa Ted window and make a 90 degree crease in a small strip at the bottom and using the surgical clamp guide it into position. The surgical clamp is a very good tool to use in installing these windows as a great deal of stability and accuracy is achieved using this tool. It will however be necessary to "jockey" the window into position using one finger through the hole and another on the other side. That way you can move it about a bit using both fingers until it is in the proper position,
Alternative method of installing through the light hole.
This method uses a dab of glue applied to a stick - in this instance the plastic model brush, and then the window stuck on the end. This is do-able but is much harder to do and a bit messier." -Tom
I ran into this situation quite a few times, too, but don't use glue on the end of my stick. I use a blob of "FLORAL CLAY." It pulls off leaving no residue - but it also pulls off before you want it to, sometimes.
- Ted
THROUGH THE ROOF APPLICATION.
Occasionally it is necessary to take off the roof in order to install the windows and doors. This is usually preferable to removing the house from the base as it is easier to get a light seal on the roof and it doesn't show as much. Again the clamp is used, however a biology lab dissecting clamp that may be more available can also be used succesfully.
Both gluing the windows and doors is easier as is positioning them. However occasionally it is necessary to remove the house from the base when the roof lines are too complex to easily remove or reinstall them and not have it show. When this is necessary one can brush paint around the INSIDE of the house with latex house or wall paint to create a light seal. It may be necessary to tint the paint to match the outside colors as some may seep through at the base and show from the outside. Far better to go through the roof when possible.
*******
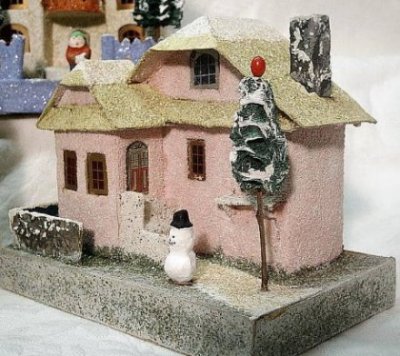
Lookie ! Lookie ! Don't these houses look nice now ! Thanks to Papa Teds' new windows.

The newer house on the left shows the white "glitter" snow on the roof. This worked because the paint on it had not yellowed very much as it has on some of the older houses and makes a nice finish."
-Tom H.
"Hmmm- I never used glue over paint like that. I just used a flat or matte finish exterior latex paint and sprinkled the "glitter" on while still tacky. If I am restoring stucco, I thickly dump on a mixture of 4 parts very fine white sand and 1 part "diamond dust" while the thick paint is still quite wet...then dump the excess right off again. (I advise doing sprinkling like this over a large "tupper-ware" type tray.) But it just goes to show - there are many ways to "skin a cat." .... Ted"
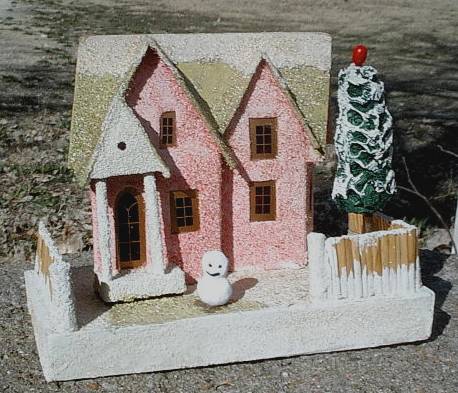
I couldn't figure out what was originally on it but it wasn't coconut. Anyway it looks good which is half the battle. Since this was basically a "go with" in an auction in which I was interested in the Hacienda next to it, I really could get experimental with it. It was necessary to remove the roof to get the large windows in it as the hole in the back is smaller than pre war stuff. When I got it the windows were gone and the chimney was missing and the roof badly worn. And yes the red glitter was the original type material but was almost gone. I used Aileens' Clear Gel glue thinned down with water and painted over the surface to be glittered. Since it dries VERY clear I went right over the original paint and sprinkled the glitter over it. This of course, took two applications. One for each color. Hope this can work for one of you too.
The Hacienda was basically just dirty but it lacked its dormer and a piece of paper from the top of the chimney was gone and the trees looked pretty bad. And the worst feature were the broken windows and windoor. A BIG THANK YOU TO TED ! (More than welcome, Tom!) Bright and sunny today and cold.
- Tom Hull
P. S. The white post war house has a price tag of 39 cents on it !"
| REPRODUCTION PARTS |
FLOCKING CEL WINDOW MULLIONS:
Many houses before 1934 had flocked or paper cutout mullioning over the cellophane of the windows. It's a lot of work, but this can be acheived in replacements in a couple of ways. Kathi M. painstakingly traces over the gold ink lines of our CEL replacements with a fine brush, using either clear fingernail polish or clear enamel, then sprinkles on the fine yellow or white flocking before it dries. In the following pictures, Tom Hull has actually made a little stamp of cardboard to print the paint on with the correct lines.

"I have made a little "Stamp" for the flocked arched windows. Actually I found that enamel paint worked well and would retain theflocking well. I also found that using a small brush to evenly apply the enamel paint to the "printer" was the way to go. Then I sprinkled on the flocking before the enamel dried. Acrylic enamels dried too quickly. The old oil base model paints worked best. After this dried I went over the mullion lines with a diluted yellow orange acrylic enamel and then sprinkled a little more flocking to dull the harshness of the yellow. I think it works well. the size is 1 6/8" long. The stamp was made up of strips of card. The center mullions were put together using the double slot interlocking system. Much like the old, old ice cube trays of the 40's. Only thee and me remember them!" -Tom Hull
Below is a church on which Tom pioneered his method.
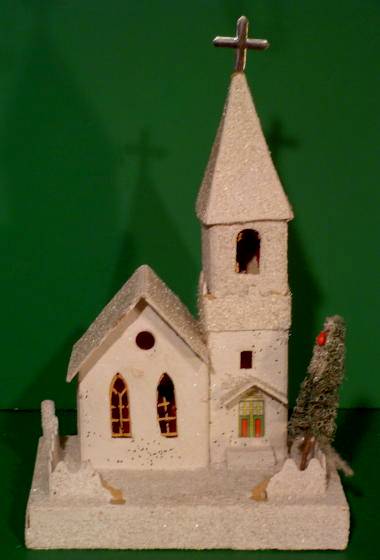
Before:

After:
"This is how the church looks with crenellations in place and the paint and sandy paint done. I took your advise, Ted and went outand got some fine sand and cleaned it and used it in the tinted paint." - Tom H.
For a more detailed article on flocking windows this way, click on:
| FLOCKING WINDOWS |
MORE ON REPLACING LOST CARDBOARD:
Roof, fences, dormers, balconies - often missing, broken off, chewed by mice. Replacing lost cardboard parts is mainly a matter of common sense and a little practice. The following series of 3 photos shows how Tom Hull has replaced a missing fence, and a whole lot more ....
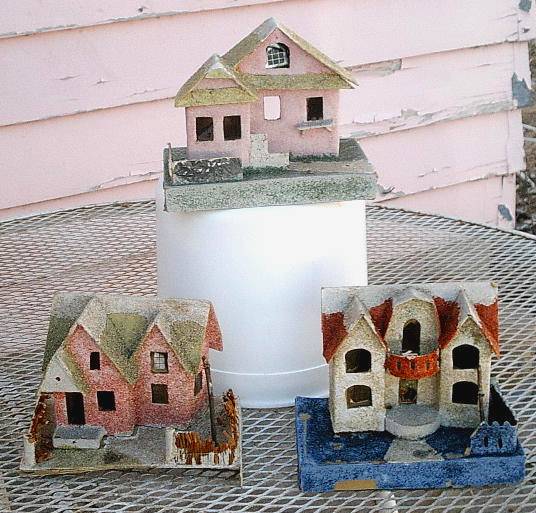
These three pieces Tom called his "faded ladies." All have been restored beautifully, now - with a whole new lease on life. In particular, I wanted you to see what he did to bring the largest ( lower right hand )into renewed splendor.
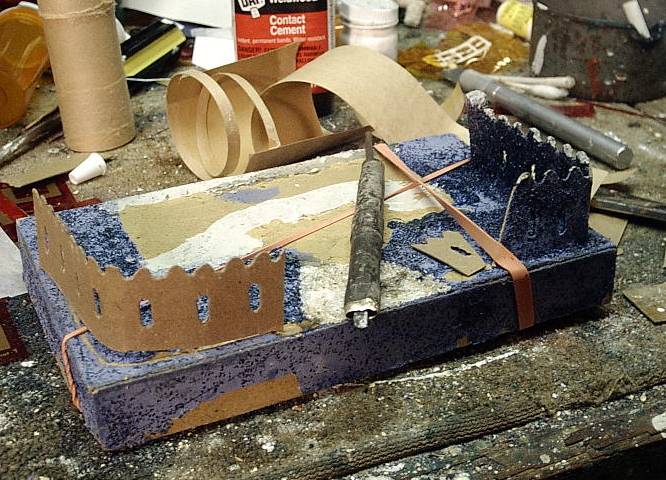
It's pretty obvious that the Japanese used hammer-driven punches to cut out door, window and fence-slot openings. As one gets one's hands on more and more houses - especially duplicates - one sees that doors and windows, though consistent in size and shape, are often off a little in their placement from one house to the next. Tom has devised a home-made punch from a piece of metal tubing to make the slots in the fence he is replacing here. Luckily, he had half the original fence to go by. He cut a piece of scrap cardstock to the right width, cut the flutings or crinalations along the top with scissors or exacto-knife, then used his punch to make the slotted openings. After it was done and glued in place, paint and texture (sand or coconut) cover a multitude of "sins."
I assume the rubber bands are holding base repairs in place while the glue dries. I have often used that technique myself.
Tom had to replace the fence posts here. Fence post are either of round, half-round, or square wood - or rolled paper, what we call the "firecracker" style. These appear to be pieces of wooden dowel. For the square, up-scale hobby shops have basswood scale lumber used in model railroading that comes in many sizes.
| MENDING FENCES |
| RESTORING A CRUSHED BASE |
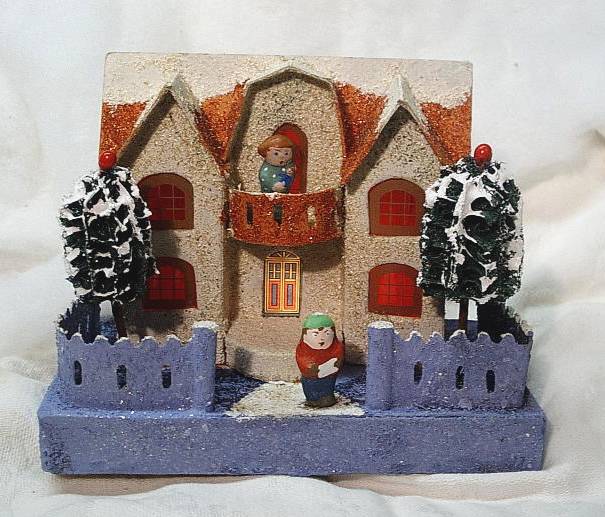
.... and here is the result! Who would know this fence was not original all the way around? ( By the way: to back what I said about irregular hole punchings, - the fence on the left is Tom's, the one on the right is original, with the slots WAY out of whack.) Or that Tom had actually made those figures himself - and hand-painted them? Tom made those trees from raw luffah and sticks, too. The windows, of course, are ours. The gutted-out "wreck" we saw in photo #1 will be a standout piece in his putzes for decades to come! As will the other "Faded Ladies" shown below ..

Note the charming flowerbox shelf under the window of this house; it's such a perfect example of the kind of fantasy-realism detail the Japanese had so much genius for...
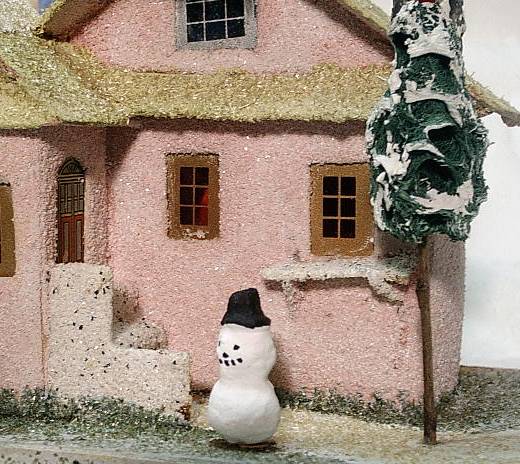
Tom has replaced the deteriorated rafia fence with one hand-crafted from wheat-straws, here. The texture is a little coarse, but overall one heckofalot better that what was left. I think it looks better than the original! The snowman is homemade, as are the trees on all examples.
Just compare these later photos to the initial picture above.
Restoring these old houses is a fascinating, inexpensive, lo-tech lovely hobby.
Click below to get to the new extension, where Tom Hull builds whole new houses totally from scratch.
| NEW HOUSES FROM SCRATCH |
For information about this site, please contact us at:
http://cardboardchristmas.com/papateds/contact.htm
|
Copyright 2000-2012 Theodore H. Althof,Jr.Except where noted, the contents of this website and all it's pages and submissions therein contained are the intellectual property of Theodore H.Althof,Jr. All rights are reserved. (Background musical selections are,of course, excepted.)
|
| This archive was set up at Ted's request in early 2012, and, except for critical updates and announcements, will remain as Ted left it in October, 2012. The archive is kept online with the help of volunteers from the following affiliated sites and resources: |
|||||
| - Christmas Memories and Collectibles - | |||||
 |

|

|

|

|

|
| - Family Activities and Crafts - | |||||
 |

|

|

|

|

|
| - Trains and Hobbies - | |||||

|

|

|  |

|
 |
| - Music - | |||||

|

|
 |

|

|
 |